Introduction
Sales Point is a simple Point-of-Sales application which tracks pending orders with a ticket system. It is web-based, mobile friendly and features a web connection to an ESC/POS printer to print a receipt for the customers.
Sales Point is intended to be used for a kiosk-style food serving station where the customers order at one desk and receive the products at another desk. The "Order Taker" creates new orders using a web browser capable device. For each order a simple receipt is printed which the customers has to show to pick up the products. Any new order is displayed on the pending order view for the kitchen crew to prepare the products. Finally, an order is completed when the server hands out the products to the client. See the user guide for more details.

The application is based on Ruby on Rails using a small mariadb. The whole system can be hosted on a small server using a fully dockerized setup (runs easily on an old laptop or Raspberry Pi). To connect all devices, a local WLAN / LAN (LAN for printer) must be setup. More technical details can be found here.
Sneak peek
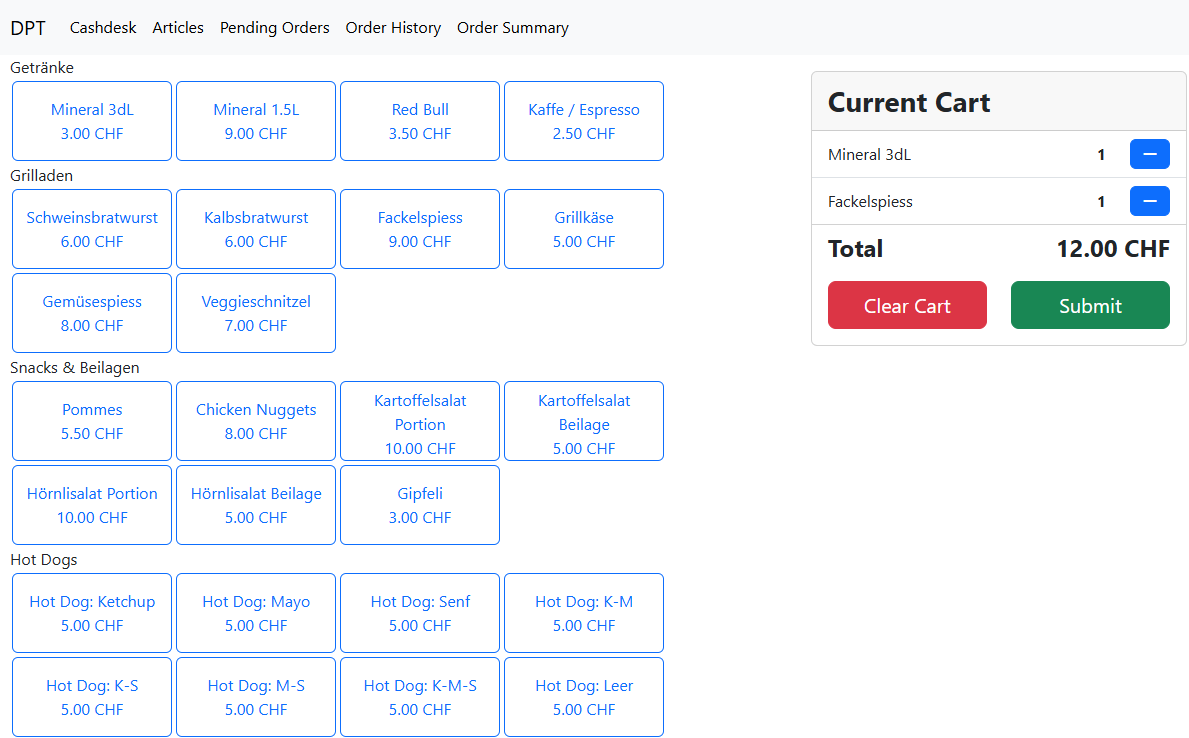
The cashdesk view to place new orders:
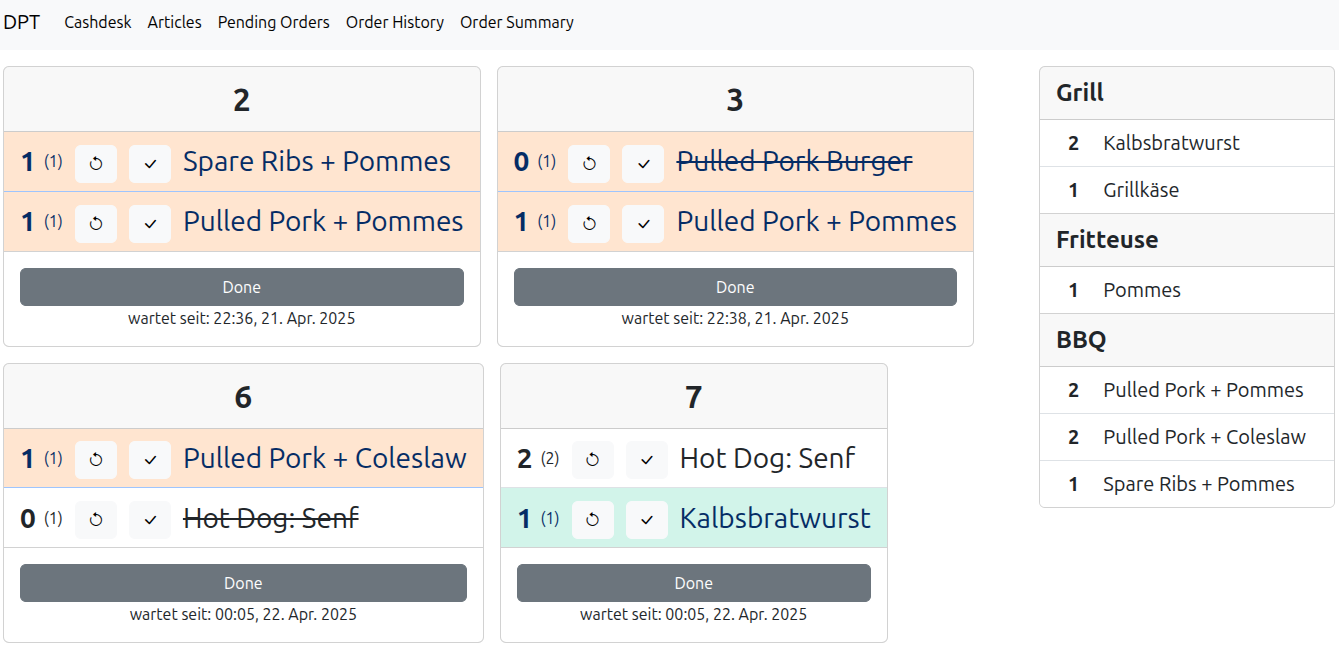
The pending orders view for the kitchen crew updating in real time:
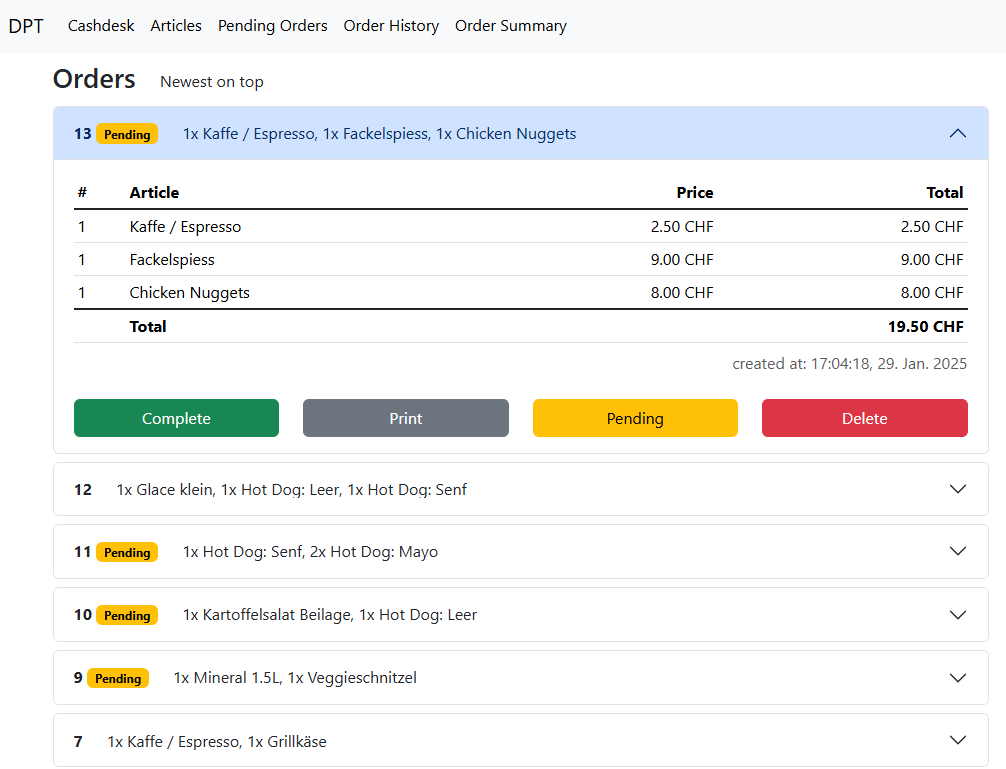
The order history view to manage and review orders:
There are more features like article management and also a limited order summary (overview of what has been sold).
Workflow
Sales Point is intended to be used at a food serving station where there are selling and pick up desks as well as a kitchen preparing the articles (i.e., food and drinks).
The workflow to serve a customer is (compare figure below):
- The customer orders the desired articles.
- The order taker submits the order and hands out the receipt. The new order is now marked as pending and shows up in the pending orders view.
- The kitchen prepares the articles. They can see all pending orders in real time on the pending orders view.
- The server hands over the articles and collects the receipt (trade receipt for articles).
- The server marks the order as complete after the last article was served.

To simplify the handover for each order a receipt is printed automatically which is handed to the waiting customer. The server then can trade the receipt for the articles. For printer troubleshooting see Printer.
How to handle orders is described in Order Handling. The most important key points are summarized below:
- An order cannot be edited. It can only be deleted. In case an order is wrong it has to be deleted in the order history and a new order has to be submitted.
- In case an order is set to completed too early it can be set back to pending in the order history.
- A receipt can be reprinted in the order history.
Skipping pending state
Some orders (e.g., if only drinks are ordered) can directly be handled by the order taker and thus must not be processed by the kitchen. Setting these orders to pending and then mark them as complete would incur unnecessary overhead. Therefore, each article can be configured whether to skip the pending state (see Article management). For example, if drinks are configured to skip the pending state, an order with only drinks is directly marked as completed in the system. In case of mixed orders, the order still is pending but the pending orders view does only show the pending articles.
Pending orders view
The pending order view shows a ticket system listing all pending orders and their articles as shown in the image below.
- The oldest order is on top left.
- Clicking the button "Done" marks the whole order as complete.
- Each article of an order can be selectively marked as done with the two buttons.
- The bold number shows the number of outstanding items where the number in () shows to total orderd amount.
- If an item was delivered, click the checkmark button. The oustanding count is reduced by one.
- To correct the delivered count, click the left button. The outstanding count is incremented by one.
- Each card shows only the articles which do not skip the pending state.
- On the right there is a kitchen station summary, see below.

Kitchen stations
On the right of the pending order view there is a summary over all pending orders listing how many times an articles in total must be produced at the current time. This listing is sorted by so called kitchen stations (in this case two, Grill & Fritteuse) which simplifies the lookup for the kitchen staff. Each article can be assigned to a kitchen station, see Article management.
Order handling
This section explains how to create and review orders.
Cashdesk - Create an order
On the cashdesk view shown below a new order can be created by clicking on the desired articles. The articles then are added to the cart. To remove or reduce an article by one press the minus button next it on the cart. Submit an order by clicking the submit button.

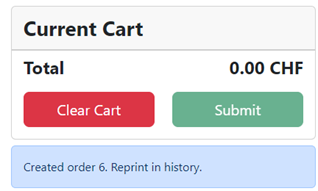
After submitting an order the receipt is printed directly and the corresponding order number is displayed below the cart (in the image below #6).
Order history - Review and edit an order
The order history view allows to review, change the state or delete any order. A submitted order can be reviewed in the order history view by clicking on the order as shown for the order 13 in the image below.
This view enables the following actions:
- Change the state of an order to pending or complete with the corresponding buttons (e.g., in case the order was set to complete too early).
- Delete an order permanently.
- Reprint a receipt for an order.
Modifying the articles of an order is not possible due to technical simplifications. If an order is incorrect it has to be deleted and a new order has to be submitted.

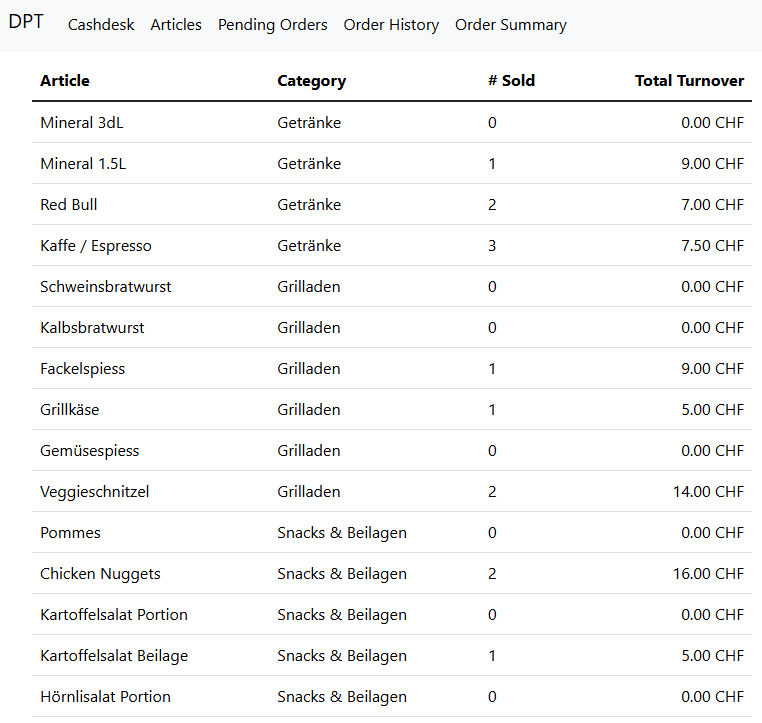
Order summary
The order summary view gives an overview of all sales. It lists all articles and how many times they have been sold and computes the total turnover.
Article management
The article view lists all registered articles and allows to create new articles as well as to edit existing articles. To create a new article click the "New" button on the top left. To edit an article click the corresponding "Edit" button.
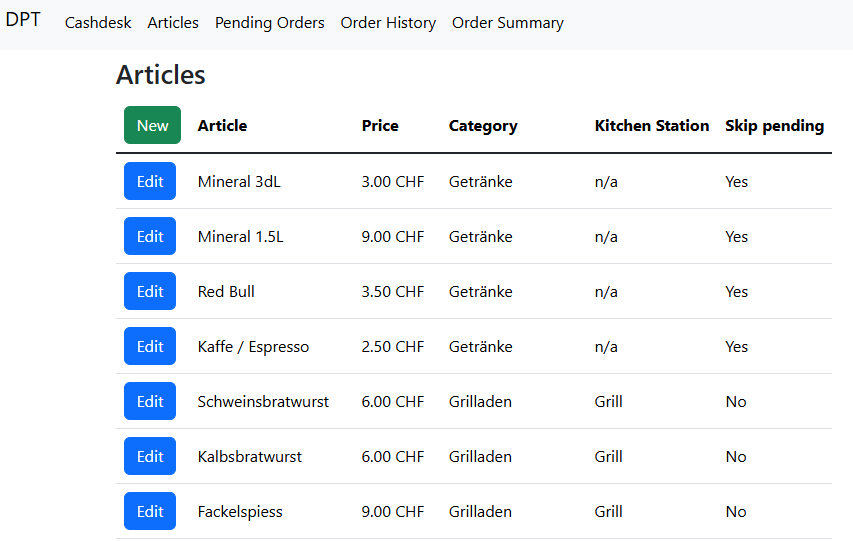
Article attributes
When creating a new or editing an existing article the following attributes must be defined.
| Attribute | Description |
|---|---|
| Name | A unique name describing the article. |
| Price | A price rounded to 0.05CHF. |
| Kitchen Station | An optional assignment to a predefined kitchen station. This is relevant for the pending orders view. Select "n/a" if the article should not be assigned to any station. |
| Category | The category the article belongs to (predefined categories). This affects the location on the cashdesk view. |
| Skip Pending | This option selects whether the article should skip the pending state. Useful for articles directly handled by the order taker, see skipping pending state |
The predefined (fixed) options for the kitchen station and category can be modified only directly in the database. See the technical documentation for more details.
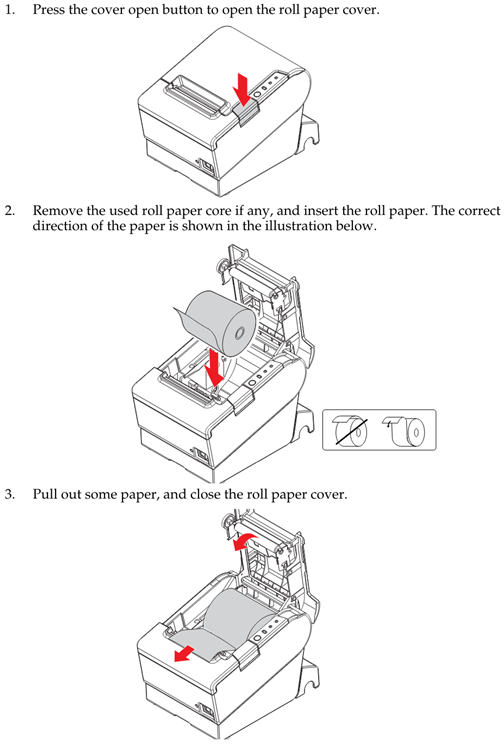
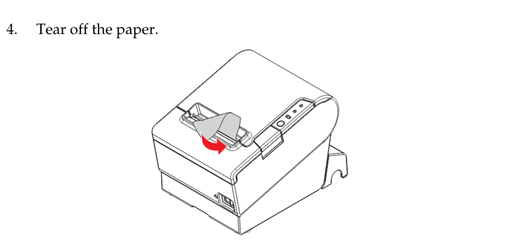
Printer
In case the printer runs out of paper follow the steps below to replace the paper roll.
Configuration
Categories, kitchen stations and printers are "hard-coded" database entries to avoid breaking any existing order entries.
Deleting an article, category or kitchen station can render existing orders invalid! As of this, these cannot be changed via the UI.
To configure a printer the database entry is as follows:
| Attribute | Description |
|---|---|
| Name | A unique printer name |
| IP | The IP address of the printer |
| Port | The port to communicate on |
| Enabled | Whether any print job should be sent to this printer |
As of now, the application takes always the printer named "Festwirtschaft" (hardcoded). The enable flag additionally controls whether to print or not. See here for how to change it.
For Categories and kitchen station there exists only a name.
Overview
Sales Points is based on Ruby 3.4.2 and Ruby on Rails 8.0.2 (see Gemfile).
It requires a JavaScript engine and a mysql dev kit like libmariadb-dev.
To setup the development environment:
- Install ruby
- Install a JavaScript engine
sudo apt update && sudo apt install nodejs -y - Then run:
bundle install --gemfile /workspaces/sales-point/Gemfileto install all rails gems - Install at least a mysql dev kit like
libmariadb-devif bundle install fails formysql2.
All this is provided in the vscode devcontainer dockerfile .devcontainer/Dockerfile.
The only thing left is to run:
bundle install --gemfile /workspaces/sales-point/Gemfilecargo install mdbook
These are not yet integrated into the dockerfile.
Frontend
The frontend is based on Bootstrap 5.3.2 (see installation guide).
Live updates are implemented using turbo streams. The order screens (pending and history) are dynamically updated using separate turbo streams. There is one stream for the history, one for pending and one for the kitchen station summary. See https://blog.corsego.com/turbo-hotwire-broadcasts for a tutorial.
For the order history view the list is paginated with the pagy gem to handle many orders. The pending screen shows only 100 pending orders to limit the loading time.
Backend
To support active jobs and turbo streams we use SolidQueue and SolidCable gems introduced in Rails 8.
These require to setup a database for the queue and cable. We use the default sqlite approach and configure the development environment to match the production environment. To setup these, follow the official docs for SolidQueue and SolidCable.
SolidQueue integrated into puma
The SolidQueue supervisor must either be run as a separate process or can be integrated into the puma server. We use the integrated approach and must set the puma config correctly.
In config/puma.rb the solid_queue plugin is loaded depending on the SOLID_QUEUE_IN_PUMA environment variable.
For development, we always load the plugin independent of the variable.
For production, this variable must be set in the host or configured to true via the kamal config in config/deploy.yml (which will set it in the host).
Time zone setting
The rail application is configured to use a time zone via config.time_zone in application.rb.
An alternative, but unnecessary, way would be to set the container's time zone the simplest is to edit the symlink of /etc/localtime.
For this run ln -fs /usr/share/zoneinfo/Europe/Zurich /etc/localtime in the container.
Database
The database used is a lightweight MariaDB.
It is instantiated in a separate docker container defined in the docker-compose.yml file.
Structure
The Sales Point main functionality is based on the following database:

- Category is used to order the articles on the new order screen.
- KitchenStation defines who is preparing the article (Grill, Fritteuse, ..)
- A cart or order is defined by its line items. These handle the articles and their count.
- The printer table is missing on the image.
Migrations
When changing the database structure, Ruby on Rails uses Migrations.
Any existing database can be migrated using /bin/rails db:migrate.
See also the official documentation.
First time setup
When spinning up any mariadb container the first time, a user and empty database must be created. For successive startups these settings are stored in a docker volume. To do so login into the docker container and then:
- login with the root user:
mariadb -p, enter root password from docker-compose - create a user and database according to the env setting (see
config/database.yml) - create a new user:
create user <dptdb> identified by '<password>'; - create a new empty database:
create database dptDev; - add user to database:
grant all privileges on dptDev.* to dptdb@'%';
Initialize a new database
To initialize a new and clean database simply use the rails command bin/rails db:setup.
This also seeds the database with the defined seeds in db/seeds.rb.
Prior to this, the database and user has to be created inside the docker container.
Backup the data
Use the mariadb-dump tool in the container:
mariadb-dump  -p -x --databases dptDev > database.sql
mariadb-dump  -pASDF -x --databases dptDev > database.sql # where ASDF is the password of the user
Then copy it from the docker container to the host with
sudo docker cp sales-point_devcontainer-db-1:/home/database.sql ./database.sql
Printer and Services
Printer
Sales Point does support the printout of a receipt using a standard ESC/POS printer like the Epson TM-T88V.
This printer can receive printing jobs via a LAN interface and communicates via the ESC/POS protocol.
For this protocol a simple library found at lib/escpos/ was created.
If an order is submitted a receipt is printed using a Active Job (part of Ruby on Rails framework, see Services).
From the application perspective a printer must be added to the printer table in the database. This table contains its IP and whether a printer is enabled. This structure is foreseen for a multi-printer setup (i.e., multiple cashdesks served by one server; not yet implemented).
The Epson printer supports DHCP but it does not work reliably. Thus, it is recommended to configure the router to set a static IP for the given MAC address.
ESC/POS printing command references
The list provides some useful references on what commands are available when printing.
- https://aures-support.com/DATA/drivers/Imprimantes/Commande%20ESCPOS.pdf
- https://www.novopos.ch/client/EPSON/TM-T88V/APG/Use_tips_eng_apg_1006.pdf
- https://upload.wikimedia.org/wikipedia/commons/1/1b/ASCII-Table-wide.svg
The printer uses code pages for characters. A useful reference is https://reference.epson-biz.com/modules/ref_escpos/index.php?content_id=32
Printer selection
As of now, the printer name to look for in the database is hardcoded.
Edit the name of the printer in app/jobs/order_print_job.rb.
It is intended to make this selection configurable.
Services
For printing a receipt ActiveJobs are used which are handled with the SolidQueue backend. See documentation and also the actual SolidQueue docs for more details.
Printer thread safety
As the printer can only handle one job at once, the ActiveJob is limited to one concurrent execution with the SolidQueue limits_concurrency option.
Deployment
Manual deployment
Use the Dockerfile-dev (or Dockerfile-prod, but requires SSL) and docker-compose.yaml file to host the final service.
First build the Docker image and then use the compose file with docker compose up -d (Note, docker-compose is deprecated).
The latest docker image version for the development environment is provided via the registry of this project. Pull it with (after authentication)
docker pull registry.gitlab.com/dorfplauschturnier/sales-point:latest
For a local setup the development environment is sufficient but for a public hosting the production Rails environment should be used. However, this requires setting up proper SSL certificates.
!! The production environment currently does NOT enforce SSL!! This is because we only use it locally and thus have no simple SSL certificates available.
For full blown hosting these guides may help:
- https://www.reddit.com/r/selfhosted/comments/md0qrc/ssl_on_raspberry_pi_for_docker_apps
- https://github.com/Matho/dockerize_raspberry_pi
Continuous Integration
Instead of the following manual setup, we could use the Kamal flow. See https://rameerez.com/amal-tutorial-how-to-deploy-a-postgresql-rails-app/.
Build the Rails application image
The Rails application is packed into a docker image with the CI job build_image.
We use kaniko to build the image in the pipeline as described here.
A runner with a docker executor must be setup as described here.
As alternative we could use a Docker in Docker approach.
However, this would require privileged mode for the runner as therefore is a security risk.
Build the mdbook
The documentation is built following this guide. The mdbook installation is fixed to a specific version as explained here.
Deploy the documentation
The mdbook is automatically deployed to the Gitlab pages with the job deploy_doc.
Deploy Sales Point
Deploying Sales Point automated requires privileged rights on the hosting server to start up / refresh the docker compose service. The simplest solution would be to add the Gitlab runner user to the docker privileged group or configure the runner as privileged. However, this is a security problem and thus we opt for a semi-automated solution (we only have one physical runner available. With a dedicated host this could be handled with tags).
The pipeline only copies the newest docker-compose.yml file to a specified location on the host which must be made accessible to the Gitlab runner user.
Then the re-run docker compose up -d manually after the image has been built.
In case the change has a database migration, this migration must be started manually from within the container.
For this login into the container and execute /bin/rails db:migrate.
To enable this copying a shell executor must be setup as Gitlab runner and the corresponding user must have access to the target location. See Raspberry Pi setup guide on how to setup the access on Linux.
Raspberry Pi setup
As a simple Gitlab runner a raspberry pi can be used and could also serve to host the website. The following guide targets the 64-bit OS!
SSH setup
SSH is deactivated per default on the raspberry pi os. A ssh access is useful but poses risks when exposed to the internet. Therefore, the ssh password login should be disabled except for local connections.
- Open
sudo nano /etc/ssh/sshd_config - Set
PasswordAuthentication no - Add exception for home network
Match address 192.168.*.* PasswordAuthentication yes - Restart the ssh service
sudo service ssh restart
Docker for pipeline
Docker must be installed as explained here (64-bit OS).
Gitlab runner
To support the continuous integration install the Gitlab runner on the Raspberry Pi.
Then register a runner with a docker executor and tag it accordingly.
It must be tagged to match the tags defined in the .gitlab-ci.yml file.
Optionally, for a semi-automated deployment of a running Sales Point a shared folder must be created matching the DEPLOY_PATH value in .gitlab-ci.yml.
In addition, a separate shell executor (a runner with shell executor) must be available with the tag specified in .gitlab-ci.yml.
Assuming the Gitlab runner runs under the user gitlab-runner, do the following steps on the Raspberry Pi
- Create the new directory
sudo mkdir -p <DEPLOY_PATH> - Create a new group named
sales-pointand add all users which should have accessgroupadd sales-point usermod -aG sales-point gitlab-runner usermod -aG sales-point TheHosterUser # the user which will start the hosting - Change the ownership
chgrp -R sales-point <DEPLOY_PATH> chown sales-point <DEPLOY_PATH> # alternatively? - Add reading, writing and execution permissions for the new group
chmod -R g+rwX <DEPLOY_PATH>
chmod 775 <DEPLOY_PATH>
chmod g+s <DEPLOY_PATH>
Troubleshooting
Localhost cant provide a secure connection
Add a fake query string after the URL to refresh the cache, e.g., http://localhost:3000/?fake=true.
Documentation
The Sales Point application is documented using mdbook and is placed at docs/.
To build the documentation install Rust and then run cargo install mdbook to install mdbook.
The documentation can be build from this location with mdbook build and view it with mdbook serve -p 8000.
Note, the port 3000 is already used for the Rails application.
Future ideas and open points
The following is an incomplete collection of feature ideas and problems.
Open points (help appreciated):
- Finalize the deployment with SSL certificates
- Setup Nginx proxy docker image / docker compose
- Use Kamal as deployment flow instead of manual setup
- Setup a local DNS server for easy access :D
Ideas:
- Enable modifiable orders
- Maybe simpler: Keep Create/Delete functionality but add functionality to copy order to cart to quickly clone a order.
- Add menu-articles
- These articles consist of multiple articels which are listed separately on the order
- Splitting articles of an order over multiple receipts
- Useful if an order must be served from two different kitchen stations.
- Add user authentication
- This would allow to have multiple selling stations (i.e., multiple printers and pending order views) and could secure the article management.
- Make printer selection configurable
- Currently the selection of the printer is hardcoded to a specific name (see
app/controllers/application_controller.rb). This should be configurable.
- Currently the selection of the printer is hardcoded to a specific name (see
- Implement proper printer backend
- Currently the "development-only" async worker backend is used to dispatch printer jobs. This backend is also not thread safe.
- Stress-test the database
- It ran well for a whole day processing more than 600 orders in total.
- Expand the order summary with time based data (a graph showing at which time of day how many, e.g., fries were sold)
- Add payment options to directly by with card / Twint
- Alternative pending screen
- Pending orders are displayed as matrix. Each row is an order and each column represents an article.
- Your idea
Contributors
Sales Point was created by Pascal Etterli for the Dorfplauschturnier hosted by UHC Blue Sharks Waltenschwil. Feel free to use Sales Point and tell me your improvement ideas (open an issue).
Copyright 2025 Pascal Etterli
Licensed under the Apache License, Version 2.0 (the "License"); you may not use this file except in compliance with the License. You may obtain a copy of the License at
http://www.apache.org/licenses/LICENSE-2.0
Unless required by applicable law or agreed to in writing, software distributed under the License is distributed on an "AS IS" BASIS, WITHOUT WARRANTIES OR CONDITIONS OF ANY KIND, either express or implied. See the License for the specific language governing permissions and limitations under the License.